Ohm's Law

The fundamental relationship among the three important electrical quantities: current, voltage, and resistance, was discovered by Georg Simon Ohm. The relationship and the unit of electrical resistance were both named for him to commemorate this contribution to physics. One statement of Ohm's law is that the current through a resistor is proportional to the voltage across the resistor. In this experiment you will test the correctness of this law in several different circuits using a Current & Voltage Probe System and a computer.

These electrical quantities can be difficult to understand, because they cannot be observed directly. To clarify these terms, some people make the comparison between electrical circuits and water flowing in pipes. Here is a chart of the three electrical units we will study in this experiment.

Electrical Quantity Description Units Water Analogy
Voltage or
Potential
Difference
A measure of the Energy
difference per unit charge
between two points in a
circuit.
Volts (V) Water Pressure
Current A measure of the flow of
charge in a circuit.
Amperes (A) Amount of water
flowing
Resistance A measure of how
difficult it is for current
to flow in a circuit.
Ohms (Ω) A measure of how
difficult it is for water
to flow in a pipe.


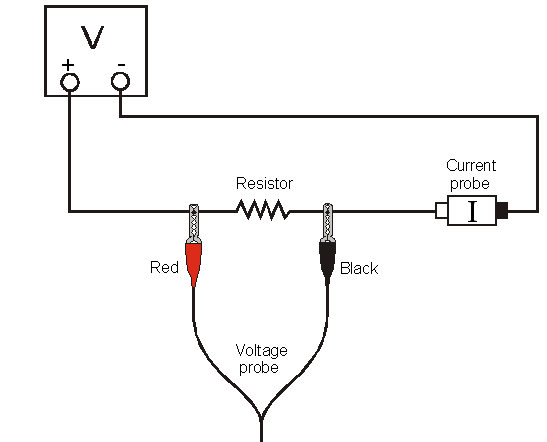
Figure 1

OBJECTIVES

MATERIALS

Power Macintoshwires
Lab Proclips to hold wires
Logger Pro 2.1light bulb (6.3 V)
Adjustable 5-volt DC power supply two resistors (about 10 and 50 Ω)
Vernier Current & Voltage Probe System

PRELIMINARY SETUP AND QUESTIONS

  1. Prepare the computer for data collection by opening "Exp 25" from the Physics with Computers experiment files of Logger Pro. A graph of potential vs. current will be displayed. The vertical axis is scaled from 0 to 6 V. The horizontal axis is scaled from 0 to 0.6 A. The Meter window displays potential and current readings.
  2. Connect DIN 1 on the Dual Channel Amplifier to CH 2 of the Lab Pro. Connect a Voltage Probe to CH 1 on the Lab Pro. Connect a Current Probe to PROBE 1 of the Dual Channel Amplifier. Using setup/sensors, use menu box to change CH 1 voltage probe to "-10 to 10 volts".
  3. With the power supply turned off, connect the power supply, 10-Ω resistor, wires, and clips as shown in Figure 1. Take care that the positive lead from the power supply and the red terminal from the Current & Voltage Probe are connected as shown in Figure 1. Note: Attach the red connectors electrically closer to the positive side of the power supply.
  4. With power turned off, click . A dialog box will appear. Click . This sets the zero for both probes with no current flowing and with no voltage applied.
  5. Have your instructor or TA check the arrangement of the wires before proceeding. Turn the control on the DC power supply to 0 V and then turn on the power supply. Slowly increase the voltage to 5 V. Monitor the Meter window in Logger Pro and describe what happens to the current through the sample as the potential difference across the sample changes. If the voltage doubles, what happens to the current? What type of relationship do you believe exists between voltage and current?

PROCEDURE

    Note: With leads of voltage probe attached and voltage supply turned off, zero all sensors.
  1. Record the value of the resistor in the data table.
  2. Make sure the power supply is set to 0 V. Click to begin data collection. Monitor the voltage and current. When the readings are stable click .
  3. Increase the voltage on the power supply to approximately 0.5 V. When the readings are stable click .
  4. Increase the voltage by about 0.5 V. When the readings are stable click . Repeat this process until you reach a voltage of 5.0 V.
  5. Click and set the power supply back to 0 V.
  6. Print a copy of the graph. Are the voltage and current proportional? Click the Linear Regression button, . Record the slope and y-intercept of the regression line in the data table, along with their units.
  7. Repeat Steps 1 – 6 using a different resistor.
  8. Replace the resistor in the circuit with a 6.3 V light bulb. Repeat Steps 2 – 5, but this time increase the voltage in 0.1 V steps up to 5.0 V.
  9. To compare slopes of data at different parts of the curve, first click and drag the mouse over the first 3 data points. Click the Linear Regression button, , and record the slope of the regression line in the data table. Be sure to enter the units of the slope.
  10. Click and drag the mouse over the last 10 points on the graph. Click the Linear Regression button, , and record the slope of the regression line in the data table.

DATA TABLE

Slope of regression line
(V/A)
Y-intercept of regression
line (V)
Resistor             Ω   
Light bulb (first 3 pts)  
Light bulb (last 10 pts)  

ANALYSIS

  1. As the potential across the resistor increased, the current through the resistor increased. If the change in current is proportional to the voltage, the data should be in a straight line and it should go through zero. In these two examples how close is the y-intercept to zero? Is there a proportional relationship between voltage and current? If so, write the equation for each run in the form potential = constant current. (Use a numerical value for the constant.)
  2. Compare the constant in each of the above equations to the resistance of each resistor (as measured using the multimeter).
  3. Resistance, R, is defined using R = V/I where V is the potential across a resistor, and I is the current. R is measured in ohms (Ω), where 1Ω = 1 V/A. The constant you determined in each equation should be similar to the resistance of each resistor. However, resistors are manufactured such that their actual value is within a tolerance. For most resistors used in this lab, the tolerance is 5% or 10%. Check with your instructor to determine the tolerance of the resistors you are using. Calculate the range of values for each resistor. Does the constant in each equation fit within the appropriate range of values for each resistor?
  4. Do your resistors follow Ohm's law? Base your answer on your experimental data.
  5. Describe what happened to the current through the light bulb as the potential increased. Was the change linear? Since the slope of the linear regression line is a measure of resistance, describe what happened to the resistance as the voltage increased. Since the bulb gets brighter as it gets hotter, how does the resistance vary with temperature?
  6. Does your light bulb follow Ohm's law? Base your answer on your experimental data.

EXTENSIONS

  1. Investigate Ohm's law for reverse currents in resistors. Turn off the power supply and reverse the connections on the power supply. Turn the power supply back on and take data from 5.0 V to 0 V. Do not stop data collection. Turn off the power supply, restore the connections to the circuit to their original configuration, and turn the power supply back on. Take data from 0 to 5 V as before. Is the current still proportional to the potential across the resistor?
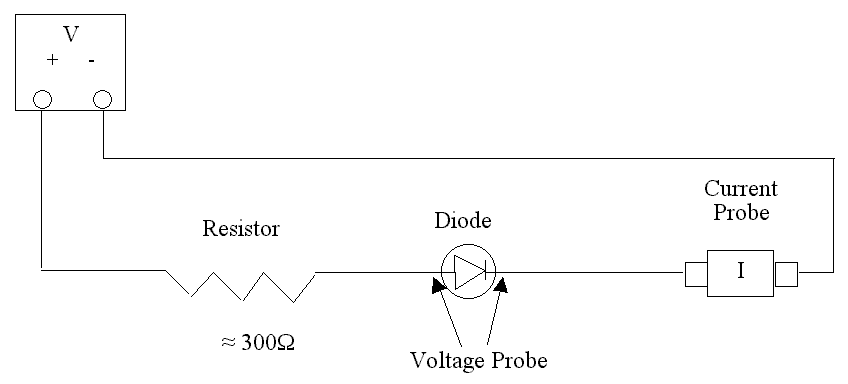
  2. Investigate the behavior of other electrical devices such as diodes, LEDs, and Zener diodes. Set up the circuit as shown using a diode and a resistor.

    Figure 2

    Using circuit Fig. 2 and voltage turned on, verify that the LED lights. If not, turn it around and check again. Starting at zero volts take data every 0.1 volts until LED starts to light. Change scale to 0.05 amps maximum on graph. Then, increase voltage taking readings every increase of .002 amps. Do a linear fit to all data points above .004 amps. Print results. Turn diode around and take data every 2 volts up to 8 volts. What happens to your current? Did the LED light?
  3. Use a low voltage AC power supply and measure current and voltage as a function of time in a simple circuit. Compare the two graphs. Create a graph of voltage vs. current. Perform a linear regression over this data and compare to the resistance in the circuit.

Adapted from Physics with Computers, by R. Sheldon, 2003