Electrical Potential
 Recall the
expression of the Coulomb force exerted on charge 1 by charge 2,
as given in the figure, is:
Recall the
expression of the Coulomb force exerted on charge 1 by charge 2,
as given in the figure, is:

where k is a constant that equals 9.0 X 10⁹ N m2/C2.
Charles Coulomb
did his experimental investigations of this force in the 18th century
by exploring the forces between two small charged spheres. Much
later, in the 20th century Coulomb's law enabled scientist to design
cyclotrons and other types of accelerators for moving charged
particles in circular orbits at high speeds.
Newton's
discovery of the universal law of gravitation came the other way
around. He thought about orbits first. This was back in the 17th
century long, before Coulomb began his studies. A statement of
Newton's universal law of gravitation describing the force
experienced by mass 1 due to the presence of mass 2 is shown below in
modern mathematical notation:

where G is
equal to 6.67 x 10⁻¹¹ Nm2/Kg2.
About the time
that Coulomb did his experiments with electrical charges in the 18th
century, one of his contemporaries, Henry Cavendish, did a direct
experiment to determine the nature of the force between two spherical
masses in a laboratory. This confirmed Newton's gravitational force
law and allowed him to determine the gravitational constant G.
Recall that the
work required to move an object in the Earth's gravitational field is
path independent. We therefore refer to the gravitational
force as a conservative force, and can define a change in the
potential energy of an object relative to another by negative the
work required to move the object. In a region where the force of
gravity is approximately a constant (such as near the surface of the
Earth), the change in potential energy is proportional to a change in
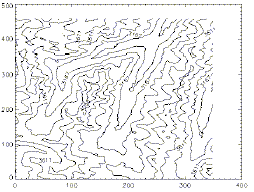
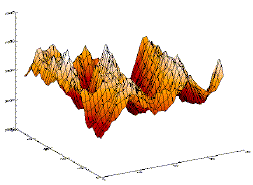
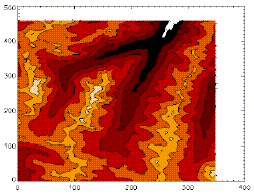
height. The following plots give us several graphical views of
the same data--the Maroon Bells quad in the Coloroda Rockies. Note how
altitude can be displayed as contour lines (panel 1, a contour map),
or a perspective
(panel 2, a surface plot) or color (panel 3, a color contour plot), or
all 3 (panel 4).
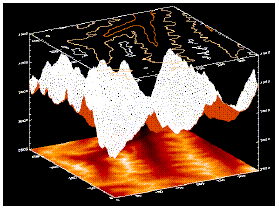
This
gives us a useful picture for potential energy. Consider a contour
map. Each line of constant height in the contour map is also a line
of constant gravitational potential energy. Also, consider the net
force on an object sitting on the surface defined by the contour map.
It will be down any hill, and perpendicular to the
line of constant height.
Since the
electrostatic force has the same mathematical form as the
gravitational force, we can make similar definitions. Consider the
force on a small positive charge (call it q0) from
some set of charges. If q0 is moved then these
charges will do work on q0. Since the
electrostatic force is also a conservative force, we can say that
there is a change in potential energy when we move the small charge,
where
 .
If we don't want our picture of the electrostatic "landscape"
to depend on the size of our test charge q0, we can
define the change in the Electric Potential as the potential energy
per unit charge, or
.
If we don't want our picture of the electrostatic "landscape"
to depend on the size of our test charge q0, we can
define the change in the Electric Potential as the potential energy
per unit charge, or
 .
.
OBJECTIVES
- To map and examine the potential distribution in two
dimensions for several simple sets of electrodes.
- To learn how to determine electric field lines from
equipotential surfaces and vice versa.
- To become familiar with the use of a
multimeter.
MATERIALS
- Field Mapper kit (cork board, conductive paper, metal tacks and wires)
- LabPro with probes
- Battery packs or power supply
- Extra wires and switches
- Paper overlay sheets for drawing results
PROCEDURE
You are given two configurations of
conductors drawn on the conductive paper. The paper is slightly
conductive, allowing a small amount of charge so that the multimeter
can make its measurements without disturbing the field. You will use
the battery sets to provide the potential differences. Be sure to
always open the switch or disconnect the wires when you are not
making measurements, so that the batteries are not worn down!
Part I Mapping the Potential
- You are given two sheets of
conductive paper on which patterns have already been drawn with
conductive ink. Select one of the sheets (either the parallel lines
or the two "point" charges). You will return and complete
the lab for the other pattern later. The most common source of
problems in this lab is with the conductive lines. The ink can
crack causing breaks in the conductive lines, or the tacks can fail
to make good contact with the ink. If your setup looks suspicious,
notify your instructor or TA!
- You will use the voltage inputs
of the LabPro or the probes of a multimeter to measure the potential
difference. ( To use the LabPro start you computer and open Logger
Pro and open a new meter window showing only potential. Select
live inputs) . Since volts are the SI units of electric potential
potential difference is often called Voltag). The ULI
measures the difference in electric potential between its inputs.
You connect two probes to the inputs. Since the probes and their
connecting wires are good conductors (at least compared to the black
paper), there is little electric field in the wires, and so little
change in potential from the probe tip to the meter. There are two
sets of probes connected to the ULI. Use the set that is not
taped together for the first part of this lab.
-
Like potential energy, electric potential is defined as a
difference. Therefore, one can always set an arbitrary zero
point for the potential. For the purposes of this lab, we will
define the zero potential point to be the negative terminal of the
power supply.
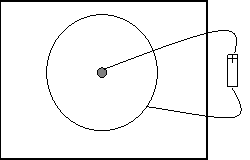
- Set up the circuit as shown
above. The battery pack should read near 5 volts. Use the
alligator clips to connect the terminals of the battery to each of
the electrodes (metal tacks) on the paper.
- Connect the probes from the
multimeter to the two electrodes. This should give very close to
the same reading as the potential difference between the two
terminals of the power supply itself. If not, there may be some bad
connection. Try to correct this yourself before calling for the
instructor or TA. Adjust the multimeter range to the smallest range
that will read this potential difference.
- You are to plot out
equipotential lines on each of the two patterns. (Once you have
completed both parts I and II for one sheet, return and
complete both sections for the other). Equipotentials are plotted
by connecting one lead of the voltmeter (the ground or
common, by convention this is often the black lead) to the
electrode connected to the negative battery terminal. The other
voltmeter lead (the probe) is used to measure the potential at any
point on the paper by simply touching the probe to the paper at that
point.
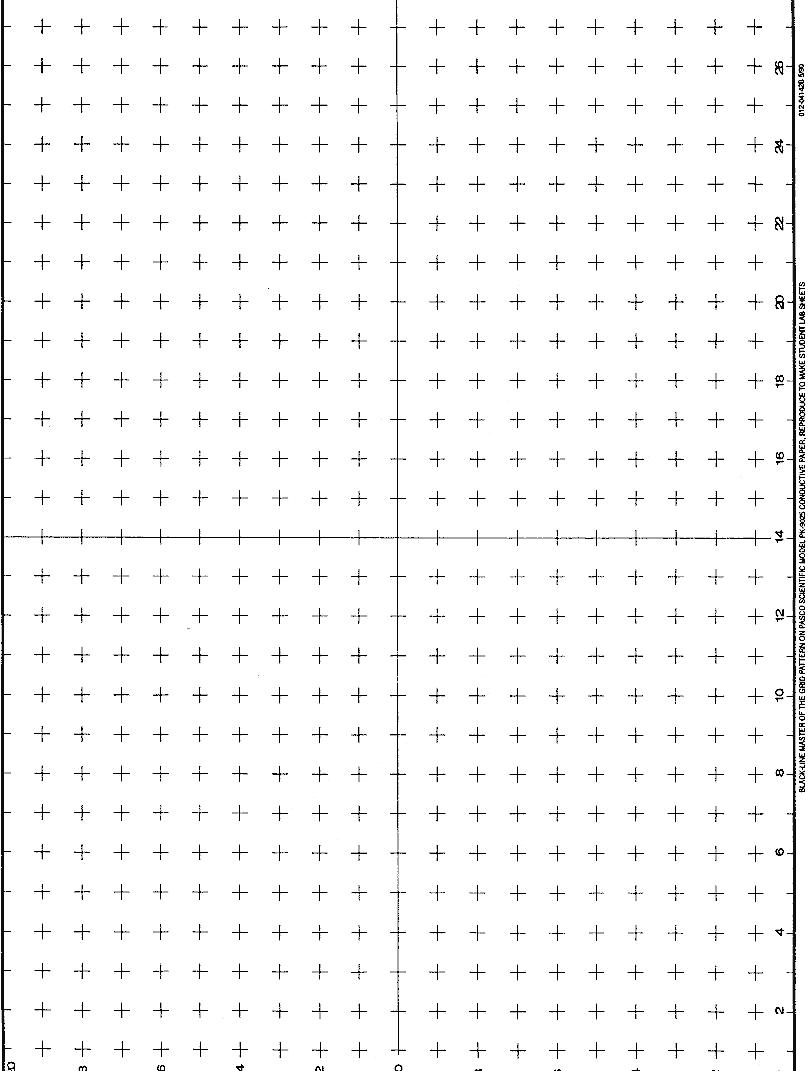
- To map an equipotential, move
the probe until the desired potential is indicated on the
multimeter. You are to mark this point on the sheets provided
(these sheets have the same grid markings as on the conductive
paper). Continue to move the probe, but only in a direction that
maintains the meter at the same reading. Continue to mark these
points. Connecting the points produces an equipotential line.
- Draw at least eight
equipotential lines, for equal steps in potential difference. For
potentials that are close to zero or the full battery potential,
this may be difficult and may take some care.
Part II Mapping the field lines
- To plot
the field lines, neither lead of the voltmeter is connected to an
electrode. Instead, the two leads of the multimeter will be placed
on the conductive paper side by side at a set distance. (It may
help to tape the two leads together for this procedure--this should
have been done for you already with the other set of leads.) The
technique is to use the multimeter leads to find the direction that
follows the path of greatest potential difference from point to
point
-
Just as the net force on an object resting on a hill is in the
direction of the steepest slope, so the electric field at any point
is in the direction of greatest change in the potential. (In fact,
the magnitude of the field is given by
 ) To find this direction, place the ground multimeter probe on the
paper near one of the terminals. Place the other multimeter lead on
the paper and note the multimeter reading. Now pivot the lead to
several positions while keeping the ground lead stationary. Note
the multimeter readings as you touch the lead at each new spot. (Do
not drag the leads). When the potential difference is the
highest, draw an arrow from the high potential spot, back to
the position of the ground lead. (Remember that the force is
downhill.) You may need to increase the sensitivity of your
multimeter for this section.
) To find this direction, place the ground multimeter probe on the
paper near one of the terminals. Place the other multimeter lead on
the paper and note the multimeter reading. Now pivot the lead to
several positions while keeping the ground lead stationary. Note
the multimeter readings as you touch the lead at each new spot. (Do
not drag the leads). When the potential difference is the
highest, draw an arrow from the high potential spot, back to
the position of the ground lead. (Remember that the force is
downhill.) You may need to increase the sensitivity of your
multimeter for this section.
- Move the
ground lead to the former position of the other lead and repeat the
action of pivoting and touching with the front lead until the
potential reading is the highest. Draw the next arrow. Repeat this
action across the paper. Eventually, the arrows will form a field
line.
- Return to
the original terminal, select a new point near the terminal and plot
another field line. For the "point charges" select
several positions around one of the points. For the parallel lines
pattern, choose several positions about the line. Be sure to pick
some near the center of the line, some near the edge, and some
positions in between. Draw at least 4 field lines on each.
- Return and complete sections I and II for the other sheet.
DATA
The sheets (sheet.tiff, sheet.png) with your equipotential lines and field lines are your
data for this lab. Use them to answer the questions in the analysis
section.
ANALYSIS
In general, you should be able
to note two relations between the equipotentials and the
field (one observation for the direction, one for the field
strength). What are these relations?
For the parallel lines, what is
the nature of the field inside the lines? How does the potential
change? What is the field outside the lines? How are the field
lines related to the conducting lines themselves?
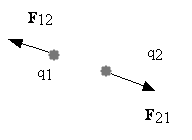
For the "point charges":
Where is the field the strongest? What path could a small positive
charge follow from "infinitely" far away to get to a
point between the charges without doing any work?
EXTENSIONS
- Draw several parallel line
configurations, with the same length of line, but different spacing
between the lines. How does this effect the strength of the field
inside the lines? How does it effect the fringing of the field
outside the lines?
 Point
source and guard ring:
Point
source and guard ring:
What relation can you determine between
the distance from the center of the point source and the potential
value? What about the field strength? (You may need to play around
with the data in Graphical Analysis.)
- Ask your instructor for other ideas to investigate: Point charges
of like sign, field near a sharp point, floating conductors or
floating insulators. In each of these cases, you are looking for
relationships between the equipotentials, the field lines, and the
shapes of the conducting (or insulating) regions.