Current in simple DC circuits
What is electric current? We have attributed the forces
between objects that are rubbed in particular ways to a
property of matter known as charge. Most textbooks assert that
the electric current that flows through the wires connected to
a battery is charges in motion. How do we know this? Perhaps
"current" is something else--another phenomenon.
This is a question that received a great deal of attention from
Michael Faraday, one of the most famous scientists of the early
nineteenth century. Faraday even studied the effects of
electricity from animals such as electric eels. He concluded,
"electricity, whatever may be its source, is identical in its
nature."1
There is a demonstration set up in the center of the lab using
the Whimshurst (German: Wimshurst) generator to show how the charge with which you
are familiar can flow in simple wire circuits and can have a
significant macroscopic effect!
In this unit, you are going to explore how charge originating
in a battery or power supply flows in wires and bulbs. You will
be asked to develop and explain some models that predict how
the charge will flow. You will also be asked to devise ways to
test your models using a device that measures the rate of flow
of electrical charge through it, and displays it on the
computer screen.
Objectives
- To understand how a potential difference results in a current
flow through a conductor.
- To learn to design and wire simple circuits using batteries,
wires, light bulbs, and switches.
- To learn to use symbols to draw circuit diagrams.
- To understand the use of microcomputer-based probes for
measuring current and voltage.
- To understand current flows at all points in simple
circuits.
Materials
- several flashlight bulbs (#14) in holders
- Connecting wires
- Two or three flashlight batteries (1.25 V. D cell)
- or an adjustable DC power supply.
- ULI with two current
probes
- and two voltage probes and Logger Pro software
Part Ia
Procedure
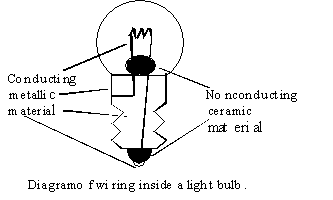
Figure 1. Edison's incandescent bulb
- Examine the bulb closely. Use a magnifying glass, if
available. The figure above shows the parts of the bulb which
are hidden from view.
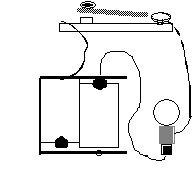
Figure 2. Simple circuit with bulb.
- Wire the circuit as in the figure, and test it. Note: For
#14 light bulbs, do not use more than two batteries for a
single bulb! Or for our bigger bulbs, no more than 6V on the
DC power supply! Leave the switch closed so that the bulb remains
on for 5 to 10 seconds. Feel the bulb. What did you feel?
What is the result of the current flowing through the bulb?
-
What do you conclude about the path needed by the current to
make the filament heat up and the bulb glow? Explain based on
all the observations you have made so far?
Note that the Current Probe measures both the magnitude and
direction of current flow.
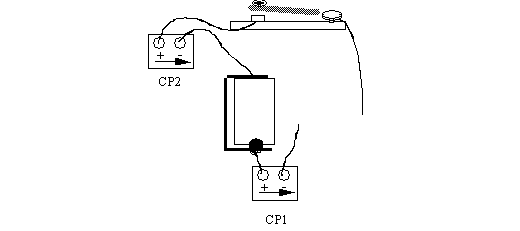
Figure 4. Proper orientation
A current flowing in through the +
terminal and out through the - terminal (in the direction of
the arrow) will be displayed as a positive current. Thus, if
the current measured by the probe in the figure is positive,
you know that the current must flow from the + terminal of the
battery, through the bulb, through the switch, and toward the -
terminal of the battery.
For consistent results, you may use the power supply instead of
a battery to supply the current. Your instructor or TA will
show you the appropriate use of the power supply. Do not
exceed 6 volts in any of the circuits in the lab.
You may measure current at up to two different places in the
circuit simultaneously.
Part Ib
-
Turn on the ULI and open the Logger Pro/ Open the file
called Ohm's Law. (You can also open Current and Voltage Probes/
Two Current probes. Whichever you open, you will have to use
the menubar setup/sensors to assign CH 1 & CH 2 as [Current
& Voltage Probe - Current]. Assign
both CH 3 and CH 4 as [Voltage (-10 V to 10V)]. Make sure
the current and voltage are all off, then from the menubar
"Zero all sensors" before connecting current probes.
- Insert the current probes into the circuit as shown in the
figure above. Be sure that the direction of the probes is the
same for both and that the probes are set to measure current
"flowing" from the positive battery terminal to the negative.
If using power supply, do not turn up voltage past the tape
mark (6V), otherwise you might burn out the light bulbs.
- Be sure that Current Probes 1 and 2 are plugged into
connectors 1 and 2 of the Current-Voltage box, and that the box
is plugged into Ports CH 1 and 2 of the ULI.
- To begin note in your lab notes the value of the current
when the switch is open and when it is closed.
- Try any other tests you need to decide on a current
model.
Sketch drawings of the circuits you used, showing where the
probes were connected. Which model do you now think is the
correct model for current flow? Why?
Note: As part of your lab reports, we will have you draw the
circuits you have constructed. One could get tired quickly of
drawing pictures of batteries, bulbs and switches. There are a
series of symbols that have been created to represent circuits.
Using these symbols will enable you to draw the nice neat
square looking circuits that you see in physics textbooks. A
few of the electric circuit symbols are shown below.
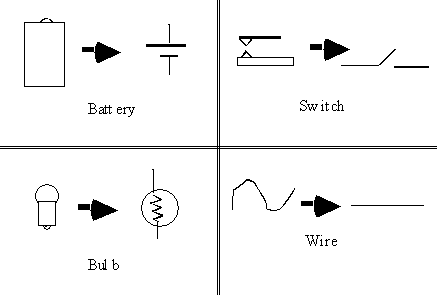
Figure 5. Some common circuit symbols
Using these symbols, the standard circuits with a
switch, bulb, wires, and battery can be represented as in the
diagram on the right.

Figure 6. A circuit sketch and corresponding diagram
Part II Voltage and current
There are actually two important quantities to consider
in describing the operation of electric circuits. One is
current, and the other is potential difference, often referred
to as voltage. As an introduction to our studies of more
complex circuits, let's actually measure both current and
voltage in a familiar circuit.

Figure 7. Symbols and connections for Current Probe (left) and
Voltage Probe (right)
This next figure shows the simple circuit with the battery and
bulb with two Voltage Probes connected to measure the voltage
across the battery and the voltage across the bulb. The
circuit is drawn again symbolically on the right. Note that
the word across is very descriptive of how the probes are
connected to measure voltage.
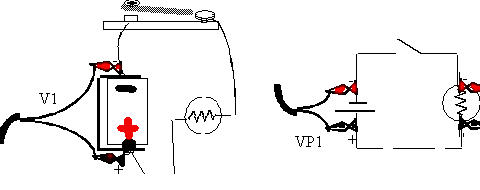
Figure 7b. Two Voltage Probes connected to measure the voltages across the
battery and the bulb.
Part III
-
Attach together black and red leads of each voltage probe
and zero all sensors
- Both voltage probes cannot be connected to circuit
simultaneously unless they are connected with both having the
correct polarity (i.e., 3 wrong ways, 1 right way to connect)
otherwise a new current loop through the ULI is created. [It appears
that the ULI puts a diode in each voltage probe that gives the probes
a defined polarity.]
Connect the Voltage Probes to measure the voltage across the
battery and the voltage across the bulb at the same time,
connecting the black (-) lead of the probe to the red (+) lead of the
battery and vice versa, doing the same for the bulb. If the bulb
lights up with the switch open, you have reversed the probe
polarity on the battery.
Record three voltage readings while closing and opening the
switch several times, as before. Note any relationship between
the voltages for each setting.
- Now connect a Voltage and a Current Probe so that you are
measuring the voltage across the battery and the current
through the battery at the same time. See the next
figure.
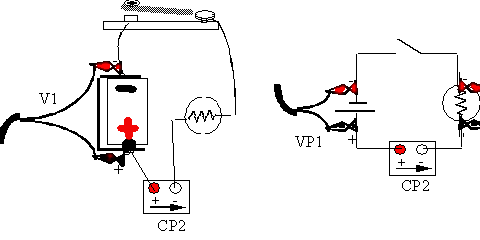
Figure 8. Probes connected to measure the voltage across the battery and
the current through it.
- Record the reading for voltage and current as you open and
close the switch. What relationship do you see here? Change
the voltage probes to be over the bulb. Repeat the above
readings.
Analysis
What conclusion do you make concerning voltage and current
through the battery and voltage and current through the
bulb?
Part IV Multiple bulbs
.
What happens if more than one bulb is put in the circuit?
There are actually two distinct ways of doing this. There are
two arrangements, known as series and parallel that are shown
in the diagrams below.

Figure 9. Series connection
Note that the bulbs are connected in a
series--the second bulb is connected to the positive terminal of
the battery through the first bulb. In the same way, the first
bulb is connected to the negative end of the battery through
the second bulb.
Parallel connection: Note that both bulbs have a direct
connection to the positive to the positive terminal of the
battery and both are connected to the negative terminal
directly through the switch.
1. Using the techniques and probes you used for the previous
sections, measure the current and then the voltage in all the
possible combinations. That is, there are three places to
measure the current (after the power supply or battery, after
the first bulb and after the second bulb) but only two current
meters. Set the meters to measure the current after both
bulbs, then after the battery or power supply and one bulb and
then the battery and power supply and the other bulb. Repeat
these measurements for the voltage as well. (So there are six
possible combinations in all). Then repeat the whole set of
measurements for the other configuration of the light bulbs
(first series, then parallel).
Analysis
Summarize your results in a table. State what conclusions you
can about the current flow and voltage drop in series and
parallel circuits.
Extensions
1. Construct at least one of the devices described below.
Sketch the circuit for each of your devices. Call over your TA
when you have it working to check out your work!
A. Christmas Tree Lights: Suppose you want to light up your
Christmas tree with three bulbs. Figure out a way to wire in
all three bulbs so that the other two will still be lit if any
one of the bulbs burns out. (Don't break the bulb! You can
simulate failure by loosening a bulb in its socket.)
B. Lighting a Tunnel: The bulbs and switches must be arranged
so that a person walking through a tunnel can turn on a lamp
for a part of the tunnel and then turn on a second lamp in such
a way that the first one turns off automatically.
C. Caller Indicator for the Deaf: A deaf person should be able
to see, by looking at one or two bulbs, whether a visitor is at
the front or back door of the house.
1Faraday,M. "Identity of Electricities Derived from
Different
Sources," in Experimental Researches in Electricity, Vol. I,
Taylor and Francis, London. (Reprinted by Dover Publications,
New York, 1965, p. 76).